


Hello, and welcome to this tutorial, here I’ll use a MLX90614 (GY906) Infrared non contact temperature sensor, I’ll use it with a LCD i²c screen and OLED display, and I’ll measure temperature in both °C and °F.
So, each object emits infrared waves depending on its heat, and these waves are detected using a thermopile which get hotter and hotter, in the same time converting the excess heat to electricity, you can learn more if you want read this Article from AZO sensors.
Here are some information about the MLX 90614 sensor:
- Range for ambient temperature: -40 to 125 ˚C (-40 to 257 °F)
- Range for object temperature (non contact): -70 to 380 ˚C (-94 to 716 °F)
- Resolution: 0.02 °C
- Accuracy: 0.5°C for (0-50 °C) both ambient and object
You can use this sensor for medical and healthcare applications, home automation, or measure surfaces using a non invasive method.
If you need to check other temperature modules here are some tutorials:
- Interfacing DS18b20 with Arduino + LCD to measure temperature in Celsius and Fahrenheit
- Measure temperature/humidity using DHT11 + LCD i2c + Arduino
- Measure temperature/humidity using DHT22 + LCD i2c + Arduino
- Measuring temperature and humidity using AM2320 (DHT12 ??) i2c sensor
- Measure high temperatures with K-type thermocouple + MAX 6675 with Arduino
Hardware and parts
Here are the parts I’ll use, I used both LCD and OLED so you can chose whatever suits your project, alongside I used a breadboard and some jump wires:


Wirings
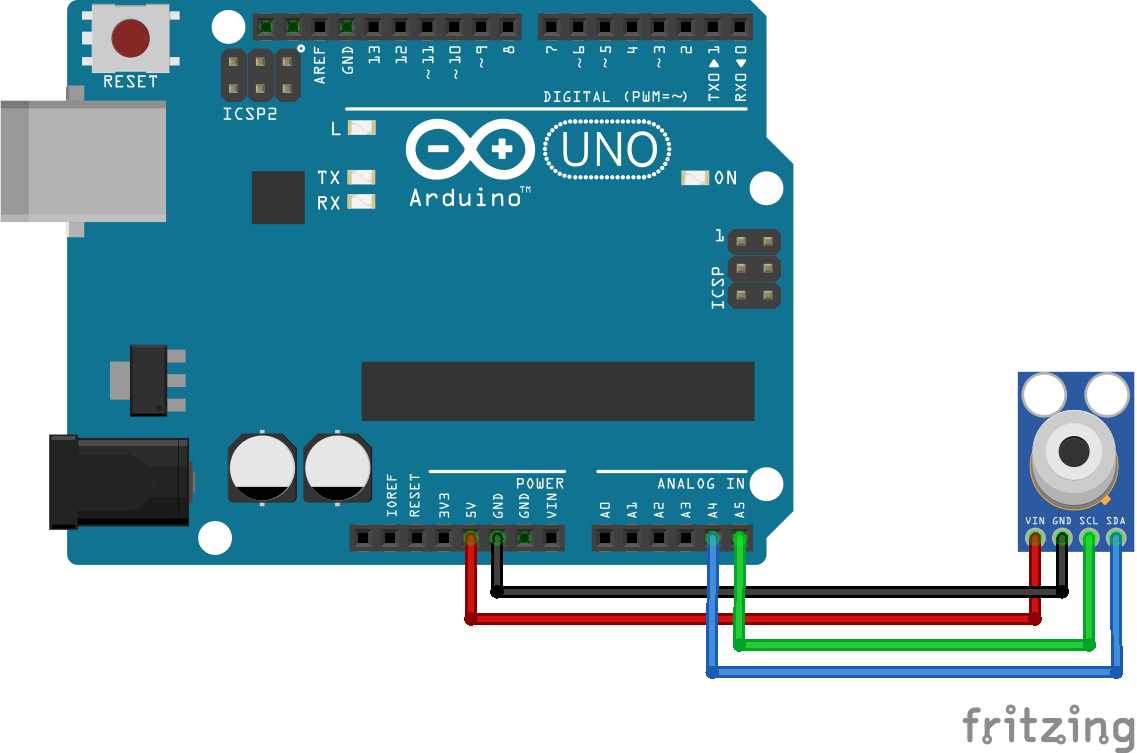
Wiring 1: Basic wiring for testing
Wiring 2 : With LCD i2c

Wiring 3: With OLED i2c, two different sizes


Libraries
- MLX90614 (GY906) Adafruit library : Download here from Github or Download here.
- If you are using an old version for the Arduino IDE you may need to add the Adafruit_BusIO: Download here from Github or Download here.
- LCD i²c library: Download here LCD i²c NewLiquidCrystal library.
- OLED libraries:
- Adafruit OLED SSD1306 library: Download here from Github or Donwload here.
- Adafruit GFX Library Download here from Github or Download here.
Codes
You can download them here or you can check below. The code results are also below.
Code 1: Library example – mlxtest
Just have the simple wiring and upload the code, open the serial monitor to test.
|
1 2 3 4 5 6 7 8 9 10 11 12 13 14 15 16 17 18 19 20 21 22 23 24 25 26 27 28 29 30 31 32 33 34 35 36 37 38 39 40 41 42 43 44 45 46 |
/*************************************************** This is a library example for the MLX90614 Temp Sensor Designed specifically to work with the MLX90614 sensors in the adafruit shop ----> https://www.adafruit.com/products/1747 3V version ----> https://www.adafruit.com/products/1748 5V version These sensors use I2C to communicate, 2 pins are required to interface Adafruit invests time and resources providing this open source code, please support Adafruit and open-source hardware by purchasing products from Adafruit! Written by Limor Fried/Ladyada for Adafruit Industries. BSD license, all text above must be included in any redistribution ****************************************************/ #include <Adafruit_MLX90614.h> Adafruit_MLX90614 mlx = Adafruit_MLX90614(); void setup() { Serial.begin(9600); while (!Serial); Serial.println("Adafruit MLX90614 test"); if (!mlx.begin()) { Serial.println("Error connecting to MLX sensor. Check wiring."); while (1); }; Serial.print("Emissivity = "); Serial.println(mlx.readEmissivity()); Serial.println("================================================"); } void loop() { Serial.print("Ambient = "); Serial.print(mlx.readAmbientTempC()); Serial.print("*C\tObject = "); Serial.print(mlx.readObjectTempC()); Serial.println("*C"); Serial.print("Ambient = "); Serial.print(mlx.readAmbientTempF()); Serial.print("*F\tObject = "); Serial.print(mlx.readObjectTempF()); Serial.println("*F"); Serial.println(); delay(500); } |
Code 2: Using LCD
|
1 2 3 4 5 6 7 8 9 10 11 12 13 14 15 16 17 18 19 20 21 22 23 24 25 26 27 28 29 30 31 32 33 34 35 36 37 38 39 40 41 42 43 44 45 |
/* This code works with MLX90614 (GY906) and LCD i²c screen * It measures both ambient and object temperature in Celsius and display it on the screen * Please visit http://www.surtrtech.com for more details */ #include <LiquidCrystal_I2C.h> #include <Adafruit_MLX90614.h> #define I2C_ADDR 0x27 //I2C adress, you should use the code to scan the adress first (0x27) here #define BACKLIGHT_PIN 3 // Declaring LCD Pins #define En_pin 2 #define Rw_pin 1 #define Rs_pin 0 #define D4_pin 4 #define D5_pin 5 #define D6_pin 6 #define D7_pin 7 LiquidCrystal_I2C lcd(I2C_ADDR,En_pin,Rw_pin,Rs_pin,D4_pin,D5_pin,D6_pin,D7_pin); Adafruit_MLX90614 mlx = Adafruit_MLX90614(); void setup() { mlx.begin(); lcd.begin (16,2); lcd.setBacklightPin(BACKLIGHT_PIN,POSITIVE); lcd.setBacklight(HIGH); //Lighting backlight lcd.home (); } void loop() { lcd.setCursor(0,0); lcd.print("Ambient "); lcd.print(mlx.readAmbientTempC()); lcd.print(" C"); lcd.setCursor(0,1); lcd.print("Target "); lcd.print(mlx.readObjectTempC()); lcd.print(" C"); delay(1000); } |
Code 3: Using OLED 128*32
|
1 2 3 4 5 6 7 8 9 10 11 12 13 14 15 16 17 18 19 20 21 22 23 24 25 26 27 28 29 30 31 32 33 34 35 36 37 38 39 40 41 42 43 44 45 46 47 48 49 50 51 52 53 54 55 56 |
/* This code works with MLX90614 (GY906) and OLED screen * It measures both ambient and object temperature in Fahrenheit and display it on the screen * Please visit http://www.surtrtech.com for more details */ #include <Adafruit_GFX.h> #include <Adafruit_SSD1306.h> #include <Adafruit_MLX90614.h> #define SCREEN_WIDTH 128 // OLED display width, in pixels #define SCREEN_HEIGHT 32 // OLED display height, in pixels #define OLED_RESET -1 // Reset pin # (or -1 if sharing Arduino reset pin) Adafruit_SSD1306 display(SCREEN_WIDTH, SCREEN_HEIGHT, &Wire, OLED_RESET); //Declaring the display name (display) Adafruit_MLX90614 mlx = Adafruit_MLX90614(); void setup() { mlx.begin(); display.begin(SSD1306_SWITCHCAPVCC, 0x3C); //Start the OLED display display.clearDisplay(); display.display(); } void loop() { display.clearDisplay(); display.setTextSize(1); display.setTextColor(WHITE); display.setCursor(0,4); display.println("Ambient"); display.setTextSize(2); display.setCursor(50,0); display.println(mlx.readAmbientTempF(),1); display.setCursor(110,0); display.println("F"); display.setTextSize(1); display.setTextColor(WHITE); display.setCursor(0,20); display.println("Target"); display.setTextSize(2); display.setCursor(50,17); display.println(mlx.readObjectTempF(),1); display.setCursor(110,17); display.println("F"); display.display(); delay(1000); } |
Test
First we test with serial monitor only, I placed my hand over the sensor, you can see the difference


Test with LCD screen, and measure in Celsius


Test with OLED screen, and measure in Fahrenheit

This is pretty much all.
Categories